A comparison between OEM Mk6 Golf catback (left) and OEM Mk6 GTI catback (right). The five suspension points are at exactly them same location, but the GTI exhaust lacks the resonator. Of course, the outlets are also different, so you'll need GTI's diffuser. (The bumper covers are the same.) To be more specific, you need the following parts:
- Rear spoiler x1 : 5K6807521H9B9
- Tow hook cover x1 : 5K6807441C9B9
- Torx screws x2: N90974701 (the GTI diffuser/rear spoiler has two more locations for screws)
- Exhaust sleeves/clamps x2: 1K0253141N (you can use the original one on the car - in that case you only need one)
- An aftermarket resonator
As suggested by several forum threads (e.g.,
this and
this), Magnaflow's 10415 resonator is a good fit for this task. I found its length just barely enough - I need to adjust the exhaust sleeves so all four ends have enough coverage on the pipes. Nevertheless, it shows no problem to me after a month and several hundred miles of driving.
The diameter of the pipe ends for both Golf and GTI catbacks are the same, around 60mm.
The outer diameter of the Magnaflow resonator is about 61mm. It's a little bit larger than both OEM exhaust pipes, and barely fit into the OEM exhaust sleeves.
Start by removing the old exhaust sleeve between the OEM resonator and the cat. My car had several winters in NY, so there is quite a bit rust on the sleeve. To make things worse, the screws are facing INTO the exhaust tunnel. I don't understand why Volkswagen does this, maybe to avoid potential damage to the screws and nuts from the road debris? But this surely makes removing the sleeve a PITA. I spent whole afternoon to fight with these two nuts. Eventually, I used a small enough wrench that can fit into the tunnel to give me right angle (most torque) on the nuts to remove them.

There are two cross members at the exhaust tunnel to strengthen the car body. The front one is just in front of the sleeve (partially shown in the photo above). This one is handy, because it can support the catalytic converter when the exhaust is removed. (Service manual warns the front side of the catalytic converter cannot be bent too much, otherwise it'll be damaged.) The rear one, however, got into the way when I tried to remove the exhaust, and needs to be removed.
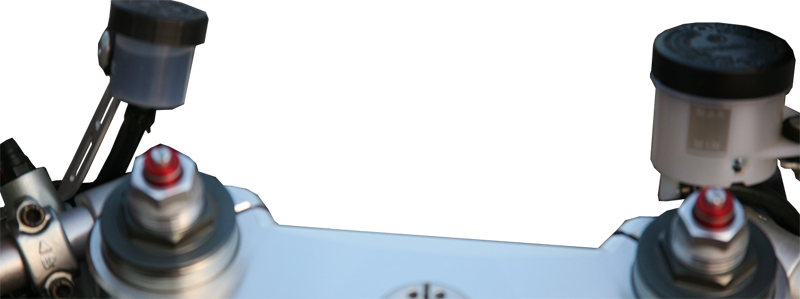
Following photos shows four of the five suspension points. (The last one can be seen from the left rear wheel well and is similar to the one below.) This one is at the rear left of the muffler and can be seen behind the bumper:
These two are just behind the rear exhaust tunnel cross member:
I removed these rubber mounts by applying some silicone spray on them, inserting a small Philips driver between the exhaust mount and the rubber mount, and forcing it out. The last mount at the rear right of the muffler is a bit different, shown in the photo below (see the annotation on the image). For this one, I removed the two bolts fitting the mount to car body (torque 25Nm) instead of removing the rubber mount from the muffler. (You still need to pull it out once the old exhaust is removed and reuse it on the new exhaust, though.)
Now simply install the new exhaust. I didn't reuse the old clamp due to rust, and also I made the screws facing downward so it'll be easier to remove next time. Photo below shows the connection between Magnaflow resonator and the catalytic converter
... and with GTI exhaust. The torque specification for the clamp screws are 25Nm. Also remember to install the rear cross member of the exhaust tunnel. Torque them to 23Nm.
Video is recorded by GoPro HD Hero 2 with open back plate, attached to the rear bumper with suction cup. The sound of this exhaust setup is surprisingly mild: outside of the car, it sounds just like a OEM "performance-version" car: with a little bit more low frequency growl comparing to the OEM Mk6 Golf 2.5L exhaust. Inside the car, there is very little difference: it just get a tiny bit louder under load, and is most noticeable when around 2000-3000rpm. (The engine noise itself covers the exhaust noise with higher rpm.) However, the sound quality is good, and feels special, mostly because of the 5 cylinder engine. I also find the engine revs a bit smoother, and the additional sound feedback also helps me on take off and heel-toe.
In summary, I don't recommend this setup for people looking for exhaust sound: the gain is minimal. For untrained ear/eye, the car just sounds and looks like OEM. Only car enthusiasts would notice the slightly revealed growl created by the 5 cylinder NA engine - an increasingly rare breed among the modern 4 cylinder turbos. Nevertheless, it's better than OEM - Volkswagen should just make this the OEM setup, in my opinion.


11 comments:
http://www.ohlins.com/Our-products-new/Motorcycle/Products/Sport/HO-944/
最近在找關於VTR250的懸吊改裝方式 剛好看到你的心得 又剛好看到ohlins終於出了VTR250的專屬後避震 希望哪天能看到有人裝上去分享心得啊~XD
真想不到Ohlins現在還會出VTR用的東西,也許是因為250cc又開始熱門了吧
我是之前的留言者~請問一下~ 你當初換後避震時是怎麼施工的? 我找了一組CBR600的showa後避震想換上去 但還沒想好要怎麼施工怎麼固定車身
至於ohlins那組 露天拍賣有賣家報價兩萬左右 不知道國外價格會不會低一點?
今天試著拆後避震時遇到兩個問題 1.上鎖點的螺絲從下方很難拆 空間太狹小 不知是否該先拆掉哪些部份才能繼續? 2.新買來的cbr600後避震下鎖點軸承做動正常 但上鎖點的部份 軸承和中間的套筒整個是卡死的 無法像下鎖點這樣轉動 這是正常的嗎? 還是我該把上鎖點軸承換新? ...以上兩點 目前無解 希望朋友你能指點我一下啊~~
年代有點久遠了,我也不記得當初施工所有的細節,所以就我還記得的部分來回應一下:
* 我當時找了一些木塊、磚頭墊在引擎油底殼下面偏後的地方,我記得因為車身重心靠前,這樣做勉強可以讓後輪騰空,但相當不穩,所以我不是很推薦
* 上鎖點的確很難拆,我記得我通常會拆掉副車架連接主車架的一根長螺絲,然後把副車架往下轉,增加空間
* 那軸承理應是可以轉動的,但我記得相當緊。可以的話,你可以裝上車,鎖緊後用避震器本體當力臂看看能否轉動
* 美國沒有VTR250(其實美國很多車都沒有...台灣的車種反而多,可能是因為都是水貨引進),所以這裡應該買不到HO944。英國Ohlins報價是343英鎊,折合台幣17600元,加關稅和運費應該也不會低於20000。我當初那支爛Hagon避震器也花了我20000,若那時有Ohlins我應該會直接買了吧 XD
話說回來,HO944好像是除了預載外全不可調的? 這樣的話實在有點陽春
後來我以鐵桿穿過車架空洞 兩旁用椅子架高的方式固定車身 換後避震成功 但這根比原來長1cm 姿勢變很怪 應該會再換回原來
不過拆vtr油箱時 油管超難拆與裝 拆裝那小小一根油管花的時間竟然比拆後避震還要久 快抓狂了
Simply wish to say the frankness in your article is surprising.Thanks for sharing.
Amazing read and info my guy! Thank you for spending the time to document this mod for the 07k platform.
Grand Sierra Resort & Casino - MapYRO
Grand Sierra Resort 서산 출장마사지 & Casino is located in Sierra Nevada, U.S.A.. Find reviews and discounts for AAA/AARP members, 광주광역 출장안마 seniors, 울산광역 출장마사지 long 당진 출장샵 stays & 전주 출장마사지 military.
Post a Comment